![]()
AWESOMELY GOOD MINOLTA FILM SCANNER UNDER $300 !
Review by D’Lynn Waldron. PhD ©03
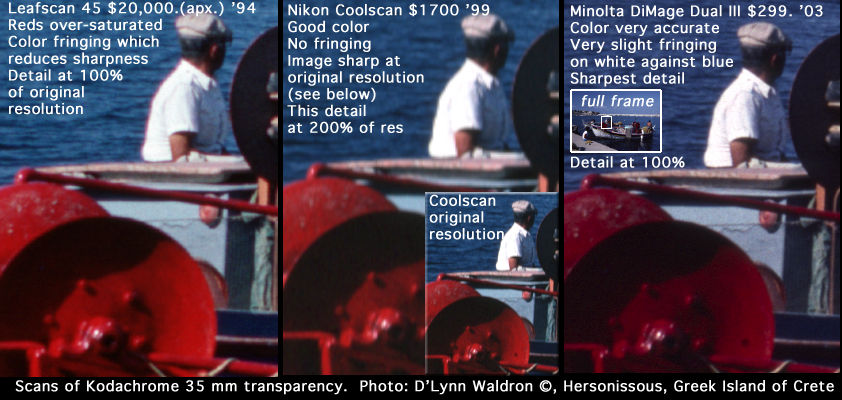
I am awestuck at the incredibly high quality and unbelievably low price of the new Minolta DiMage Scan Dual III slide scanner, which sells for between $269 and $299. Compare the images below of a scan with a $20,000 Leafscan 45 in 1994, on the left, Nikon $1700 Coolscan in 1999, center and the $299 DiMage Dual III in 2003. The DiMage has more accurate color, better highlight and shadow detail, is sharper and has almost no fringing. The DiMage scans in 48 bit color (which you can save as 48 bit and then reduce to 24 bit to work on in Photoshop.) Here the DiMage scan has been reduced to 24 bit and all thee images are jpeged at 80% quality in ProJPEG so they are all but indistinguishable from the source files. These images were all scanned at the factory default settings.
The Minolta Dimage Scan Dual III has very well designed hardware, excellent software, and produces a very sharp image with better detail in highlights and shadows than I could get from scanners I have tested in past years that cost over $20,000.
The Minolta Dimage Scan Dual III is a 48 bit scanner with a claimed dynamic range of an astounding 4.8 and I believe it!
Unlike most scanners, it does equally well with slides and the much more difficult negatives.
The Minolta Dimage Scan Dual III is a full 4k professional resolution scanner that gives an image of up to 2688 x 4032 pixels per 35mm slide or film strip frame.
The lowest res takes only a few seconds to scan and the highest res takes around one minute for a single pass. Overscanning multiplies the time.
The scanner comes with two very well designed carriers. One carrier handles 4 slides, and the other 6 frames of strip film. The carriers keep the slides and strip frames in perfect alignment, which individual feed-in mechanisms do not.
These carriers create an autofeed that works perfectly (unlike the Nikon add-on stack load autofeeder which never worked at all).
There is an optional APS adapter.
The Minolta Dimage Scan Dual III scans in 16 bits per R, G and B channel for a total of 48 bits which produces noticably better gradiations than 12 bits, whether you look at the image in the original 48 bits or have the scanner or Photoshop reduce it to the standard 24 bits. I save all the files in 48 bits on CD or DVD and reduce them to 24 bit to work on in Photoshop, which allows only a limited number of tools and filters to be used in 48 bit.
IT IS CRITICAL that in Preferences under Color, in your inital set-up for all scanning, that you change the default sRGB, which is Microsoft’s disasterously truncated color space, to one of the full gamut options. I use Adobe RGB because I use all Adobe imaging software.
The driver software that comes with the scanner is truly excellent and provides a Wizard level for beginners, a choose and click level for amateur users, and full controls for professionals (see below). This is the most user friendly driver software at all levels I have ever found.
The driver works as a Photoshop plug-in, and as a stand alone application. The excellent Photoshop Elements ($90 if you buy it in the box) is bundled with the scanner. The only major limitation of Elements is that it does not handle 48 bit images, but most people are not interested in saving the original 48 bit scan.
The Minolta Dimage Scan Dual III slide scanner is USB 2 (backward compatible to Mac 1.1) and works with both Mac and Windows. As with many such devices, the USB must be built into the computer, not a later add-on card (which requires its own separate card driver that the scanner software cannot find.)
The transformer’s plug is at the end of a short cord so that it does not overlap other sockets on the strip- if only all transformers came that way!
NOTES ON USE-
1) For the carrier to be activated the drop down door on the front must be in the halfway position (fully open is for the APS casette adapter to be put in.)
2) The software defaults to low res and you must set it to the higher resolutions for each slide in the carrier, if that is what you want.
3) If the software says it cannot find the scanner, then with that notification screen still open, turn the scanner power off and on.
WARNING: After scanning, the carrier does not automatically move back out and the light stays on, so you want to be sure you are there to push the eject button after completion of the scanning to protect your film.
If you need a slide scanner, as of February 2003, this is the one to get.
ADVANCED USER AND TECHIE INFO
LIGHT SOURCE Three-wavelength cold cathode florescent light. Single pass scanning in which the carrier moves over a line of 2700 CCDs for a 35mm scan of up to 2688 x 4032 pixels, which is the full 4k for film recorders such the Lasergraphics.
BIT DEPTH is 16 bits per R, G and B channel for a total of 48 bits which produces noticably better gradiations than 12 bits.
ANALOG/DIGITAL CONVERSION You have a choice of getting the original 48 bit scan, which you can later convert to 24 bits if you wish in Photoshop, or having the scanning software do the conversion to give you a standard 24 bit image.
Only advanced imaging programs like the full Photoshop can handle 48 bit images and even then the functions that can be applied to them are greatly reduced- for instance in Photoshop you can clone, but not use a brush on a 48 bit image, and there is no Layers facility.
Because the 48 bit image contains all the color data from the original scan, I always save that to a CD or DVD disc, along with the 24 bit image if I have done work on it.
For most uses, the conversion from 48 to 24 bit makes barely perceptible changes in the smoothness of the gradients. However there is a VERY great difference in the quality between the 24 bit image reduced from a 36 bit scanner and the 24 bit images reduced from a 48 bit scanner such as this.
OVERSCANING TO REDUCE NOISE With all scanners there tends to be noise (random extraneous colored pixels) in the dark areas, and the darker the area the more noise there is.
Because the noise is random, scanning multiple times and then averaging the results will get rid of those random pixels of color. The Minolta offers 2x, 4x and 8x scanning, but of course that increases the time proportionately. I use 2x scanning on almost all my images which is a satisfactory trade off between time and noise reduction, and 4x or 8x where needed.
ADJUSTMENTS Advanced adjustments are the kind found in Photoshop, with the additional advantage that all the adjustment windows can be open at same time and they work interactively. The advanced adjustments are faithfully reflected in the prescan version and can be viewed in a before and after split screen.
Automated Pixel Brush is the equivalent of the automatic color adjustment in Photoshop. As in Photoshop, sometimes it works well, and sometimes it makes things much worse, depending on the image. When scanning more than one slide at once, you cannot select which slide to use Pixel Brush on- it is all or none. For faded, color shifted, and under or over exposed images I prefer to go into the advanced tools.
Automated Dust Brush software removes very small particles of surface dirt without a significant loss of sharpness, but unlike the Digital Ice technology which I have reviewed elsewhere, it does not do a 3D analysis that also removes scratches and larger specks of dirt. When scanning more than one slide at once, you cannot select which slide to use Dust Brush on- it is all or none.
Auto focus is needed only once for a given type of slide mount if the film is reasonably flat, after which you can turn it off to save time.
Autofocus reads the center of the frame, so if the film is curled, you may want to manually select the area that is to be in maximum focus.
There is also a visual Manual focus facility which has an excellent focus feedback system to speed things up, but it is still time consuming and rarely of any additional value.
Auto Exposure is the best place to start any adjustments using the advanced tools. You can manually adjust the overall exposure, but it is far better to go into curves and other advanced adjustments to control what tonal areas of the image will be lighter and darker.
Unsharp Mask can be preset for a certain amount on all slides in the scanning set, or done manually in which it goes one better than Photoshop because it allows you to protect dark areas in an adjustable range so you are not sharpening noise. Unfortunately there is no interactive preview window for Unsharp Mask, so I usually do that afterwards in Photoshop.
Tone Curves/Histogram is what you use to optimize the detail in highlights and shadows
Hue/Saturation/Lightness is what you use to adjust color and exposure.
Variations shows you the kinds of changes you can make and provides sliders to fine tune them.
Selective Color adjustment divides the image into CMYK values rather than RGB and lets you adjust those individually as you would in preparing a image for a four color printing press. This adjustment is useful for some kinds of color correction even though the final output from the scanner will be RGB.
IT IS CRITICAL that in preferences you deselect the default sRGB, which is Microsoft’s disasterously truncated color space and instead choose one of the full gamut options. I use Adobe RGB.
The scanner manual does not go into all the apects of using all the professional controls and for this you can consult a Photoshop book since they are virtually the same. For a Web site with more detailed description of all the controls in the software you can go to:
http://www.imaging-resource.com/SCAN/DSEIII/DSEIIIA.HTM
If you need to scan 35 mm negatives or positives, the Minolta Dimage Scan Dual III is a fabulous slide scanner at an unbelievably low price.
![]()